이전 글에서는 "마스크 착용 여부 탐지 프로젝트"의 개요를 간단하게 알아봤습니다.
[인공지능 프로젝트] 마스크 착용 여부 탐지 프로젝트 - 1편
이번에는 제가 학교에서 진행했던 "마스크 착용 여부 탐지 프로젝트" 에 대해서 설명하겠습니다. 📌 깃허브 링크: https://github.com/lko9911/Mask_Detection_Project GitHub - lko9911/Mask_Detection_Project: 강원대학
whitecode2718.tistory.com
이번에는 프로젝트의 구현 방식 중 YOLO에 대해서 다루겠습니다.
📌 깃허브 링크: https://github.com/lko9911/Mask_Detection_Project
GitHub - lko9911/Mask_Detection_Project: 강원대학교 2024 빅데이터분석및활용 과목 기말프로젝트 과제 : 마
강원대학교 2024 빅데이터분석및활용 과목 기말프로젝트 과제 : 마스크 착용 여부 감지 프로그램 개발 - lko9911/Mask_Detection_Project
github.com
1. YOLOv10x Object Detection의 개요
마스크를 착용했는지 판단하기 위해서는 사람의 얼굴을 검출(Detect)해야합니다. 이를 위해서 물체 검출(Object Detection)기능을 수행할수 있는 YOLOv10x 모델을 파인튜닝하여 사용했습니다.
아마 제 블로그에서 하는 대부분의 프로젝트는 YOLO로 진행했는데, 그 이유는 데이터 라벨링을 하는 플렛폼이 많고, Ultralytics의 YOLO는 학습이 매우 간단하고 성능도 실시간성을 확보하면서 다른 검출모델과 뒤쳐지지 않는 성능을 보이기 때문입니다. 최근에는 segmation도 실시간으로 가능합니다.
YOLO같은 모델을 파인튜닝하기 위해서는 사람의 얼굴과 그에 매칭되는 바운딩박스 데이터셋이 있어야 합니다. 하지만 사람의 얼굴을 데이터로 사용할때는 초상권 혹은 윤리적으로 문제가 될수도 있기 때문에 조심해야합니다. 때문에 저는 공공데이터로 존재하는 Kaggle의 Face Mask Detection 데이터 셋을 사용하였습니다.
Face Mask Detection
853 images belonging to 3 classes.
www.kaggle.com
데이터셋 설명
마스크는 호흡기 질환으로부터 개인의 건강을 보호하는 데 중요한 역할을 합니다. 특히 면역화가 이루어지지 않은 상황에서 COVID-19 예방을 위한 몇 안 되는 예방 조치 중 하나입니다. 이 데이터셋을 사용하면 마스크를 착용한 사람, 마스크를 착용하지 않은 사람, 또는 마스크를 잘못 착용한 사람을 탐지하는 모델을 만들 수 있습니다.
데이터셋 정보
이 데이터셋은 3개의 클래스에 해당하는 853장의 이미지와 PASCAL VOC 형식의 바운딩 박스를 포함하고 있습니다. 또한 YOLO 학습을 위한 데이터는 xml파일로 구성되어 있습니다.
클래스 목록
- With mask (마스크 착)
- Without mask (마스크 미착용)
- Mask worn incorrectly (마스크 잘못 착용)
데이터셋은 총 3개의 라벨 " With mask (마스크 착용)", "Without mask (마스크 미착용)", "Mask worn incorrectly (마스크 잘못 착용)" 이 있지만, 프로젝트의 목표는 마스크의 착용 유무를 판단하고, 마스크를 정상적으로 착용했는지 검사하는 것이기 때문에 "with_mask"라벨만 사용하였습니다. 여기서 "with_mask"만 사용했다는 의미는 기존 "with_mask" 와 "mask_weared_incorrect"를 포함한 개념입니다.
전체 데이터셋 (mask 라벨만 가진 이미지)의 70%는 학습셋, 15%는 검증셋, 15%는 테스트셋으로 구성하였습니다.
다음으로 참고한 코드는 다음과 같습니다.
1. Face Mask Detection with YOLOv11
- https://www.kaggle.com/code/ihsncnkz/face-mask-detection-with-yolov11
참고 내용: YOLO 학습을 위한 데이터셋 디렉토리 구성과 패키지 설치
2. [Face Mask Detection ANN, CNN & Transfer Learning]
- https://www.kaggle.com/code/sahityasetu/face-mask-detection-ann-cnn-transfer-learning
참고 내용: CNN과 전이 학습 모델 설계와 비교
이제 제가 사용했던 코드에 대해서 설명하겠습니다.
2. YOLO 학습 코드
주의: 해당 데이터셋에서는 사람의 얼굴이 포함되어있기 때문에, Kaggle 사이트에서 사용하는 걸 추천드립니다.
(구글 코랩에서는 사람 얼굴이 데이터셋에 있다면, 딥페이크 작업으로 의심받을 수 있습니다.)
코드는 아래 깃허브 사이트에서 ipynb를 캐글에 업로드해서 사용하면 됩니다.
잡다한 부분은 주석에 설명했기에, 학습에 필요한 부분만 설명하겠습니다.
YOLO 학습을 위한 준비
# 라이브러리 임포트 (xml 파일 읽기 및 사진 보기)
import numpy as np
import pandas as pd
import matplotlib.pyplot as plt

import xml.etree.cElementTree as ET
import glob
import os
import json
import random
import shutil

from PIL import Image, ImageOps

import kagglehub

# 다운로드
path = kagglehub.dataset_download("andrewmvd/face-mask-detection")

# 다운로드 위치 출력
print("Path to dataset files:", path)
필요한 라이브러리와 캐글 데이터셋을 가져오는 코드입니다.
# xml 파일에서 bbox 정보를 따로 저장
def xml_to_yolo_bbox(bbox, w, h):
    x_center = ((bbox[2] + bbox[0]) / 2) / w
    y_center = ((bbox[3] + bbox[1]) / 2) / h

    width = (bbox[2] - bbox[0]) / w
    height = (bbox[3] - bbox[1]) / h

    return [x_center, y_center, width, height]

def yolo_to_xml_bbox(bbox, w, h):
    w_half_len = (bbox[2] + w) / 2
    h_half_len = (bbox[3] + h) / 2

    xmin = int((bbox[0] + w) - w_half_len)
    ymin = int((bbox[1] + h) - h_half_len)
    xmax = int((bbox[0] + w) + w_half_len)
    ymax = int((bbox[1] + h) + h_half_len)

    return[xmin, ymin, xmax, ymax]
바운딩 박스 정보를 반환하는 코드입니다. 정확히는 대상의 라벨링 정보를 별도의 파일로 기록하기 위한 역할을 수행합니다.
# 본 코드는 YOLO 데이터 구성 노트를 참고 하였으며, 후에 목적에 따라 변경합니다.

classes = []

os.makedirs('result/labels', exist_ok=True)
input_dir = '/root/.cache/kagglehub/datasets/andrewmvd/face-mask-detection/versions/1/annotations'
output_dir = 'result/labels'
image_dir = '/root/.cache/kagglehub/datasets/andrewmvd/face-mask-detection/versions/1/images'

if not os.path.exists(output_dir):
    os.mkdir(output_dir)

files = glob.glob(os.path.join(input_dir, '*.xml'))
for fil in files:
    basename = os.path.basename(fil)
    filename = os.path.splitext(basename)[0]
    if not os.path.exists(os.path.join(image_dir, f'{filename}.png')):
        print(f'{filename} image does not exist')
        continue

    result = []

    tree = ET.parse(fil)
    root = tree.getroot()
    width = int(root.find('size').find('width').text)
    height = int(root.find('size').find('height').text)

    for obj in root.findall('object'):
        label = obj.find('name').text

        if label not in classes:
            classes.append(label)

        index = classes.index(label)
        pil_bbox = [int(x.text) for x in obj.find('bndbox')]
        yolo_bbox = xml_to_yolo_bbox(pil_bbox, width, height)

        bbox_string =  ' '.join([str(x) for x in yolo_bbox])
        result.append(f'{index} {bbox_string}')

    if result:
        with open(os.path.join(output_dir, f'{filename}.txt'), 'w', encoding = 'utf-8') as f:
            f.write('\n'.join(result))

#-- 파일 확인
with open(f'{output_dir}/classes.txt', 'w', encoding = 'utf-8') as f:
    f.write(json.dumps(classes))

print("클래스 구성")
with open(f'{output_dir}/classes.txt') as f:
    contents = f.read()
    print(contents)

annotation_count = len(os.listdir("/root/.cache/kagglehub/datasets/andrewmvd/face-mask-detection/versions/1/annotations"))
labels_count = len(os.listdir("result/labels"))
print(f"Annotation 개수: {annotation_count}")
print(f"레벨의 수: {labels_count}")여기까지가 주어진 데이터셋을 YOLO 학습 데이터셋으로 바꾸는 코드입니다.
import os

# 디렉토리가 없으면 생성
if not os.path.isdir('result/data'):
    os.mkdir('result/data')

if not os.path.isdir('result/data/train'):
    os.mkdir('result/data/train')
if not os.path.isdir('result/data/val'):
    os.mkdir('result/data/val')
if not os.path.isdir('result/data/test'):
    os.mkdir('result/data/test')

if not os.path.isdir('result/data/train/images'):
    os.mkdir('result/data/train/images')
if not os.path.isdir('result/data/train/labels'):
    os.mkdir('result/data/train/labels')

if not os.path.isdir('result/data/val/images'):
    os.mkdir('result/data/val/images')
if not os.path.isdir('result/data/val/labels'):
    os.mkdir('result/data/val/labels')

if not os.path.isdir('result/data/test/images'):
    os.mkdir('result/data/test/images')
if not os.path.isdir('result/data/test/labels'):
    os.mkdir('result/data/test/labels')

# 구성 확인
metarial = []
for i in os.listdir("/root/.cache/kagglehub/datasets/andrewmvd/face-mask-detection/versions/1/images"):
    str = i[:-4]
    metarial.append(str)

metarial[0:10]

print("전체 이미지 수: ", len(metarial))
train_size = int(len(metarial) * 0.7)
test_size = int(len(metarial) * 0.15)
val_size = int(len(metarial) * 0.15)
print("학습셋의 크기: ", train_size)
print("테스트셋의 크기: ", test_size)
print("검증셋의 크: ", val_size)
학습에 필요한 디렉토리 생성, 예전에 했던 프로젝트라 일일히 나누었지만, loader 함수를 따로 만들어서 이 과정을 일괄로 진행할 수 있습니다.
# YOLO 학습을 위한 데이터셋 구성 함수
def preparinbdata(main_txt_file, main_img_file, train_size, test_size, val_size):
    for i in range(0, train_size):
        source_txt = main_txt_file + "/" + metarial[i] + ".txt"
        source_img = main_img_file + "/" + metarial[i] + ".png"

        mstring = metarial[i]
        train_destination_txt = "result/data/train/labels" + "/" + metarial[i] + ".txt"
        train_destination_png = "result/data/train/images" + "/" + metarial[i] + ".png"

        shutil.copy(source_txt, train_destination_txt)
        shutil.copy(source_img, train_destination_png)

    for l in range(train_size , train_size + test_size):

        source_txt = main_txt_file + "/" + metarial[l] + ".txt"
        source_img = main_img_file + "/" + metarial[l] + ".png"

        mstring = metarial[l]
        test_destination_txt = "result/data/test/labels" + "/" + metarial[l] + ".txt"
        test_destination_png = "result/data/test/images" + "/" + metarial[l] + ".png"

        shutil.copy(source_txt, test_destination_txt)
        shutil.copy(source_img, test_destination_png)

        #metarial.remove(file_name[:-4])


    for n in range(train_size + test_size , train_size + test_size + val_size):

        source_txt = main_txt_file + "/" + metarial[n] + ".txt"
        source_img = main_img_file + "/" + metarial[n] + ".png"

        mstring = metarial[n]
        val_destination_txt = "result/data/val/labels" + "/" + metarial[n] + ".txt"
        val_destination_png = "result/data/val/images" + "/" + metarial[n] + ".png"

        shutil.copy(source_txt, val_destination_txt)
        shutil.copy(source_img, val_destination_png)

 preparinbdata(main_txt_file = "result/labels",
              main_img_file = "/root/.cache/kagglehub/datasets/andrewmvd/face-mask-detection/versions/1/images",
              train_size = train_size,
              test_size = test_size,
              val_size = val_size)

# yaml 파일 구성
yaml_text = """train: /content/result/data/train/images/
val: /content/result/data/val/images/

nc: 3
names: ["with_mask", "mask_weared_incorrect", "without_mask"]"""

with open("result/data/data.yaml", 'w') as file:
    file.write(yaml_text)

with open("result/data/data.yaml") as f:
    contents = f.read()
    print(contents)
여기서 yaml_text는 YOLO에게 지정하는 명령과 같은 느낌입니다. 지금은 names: [3가지 클래스]를 예측하도록 되어있죠.
우리가 원하는건 하나의 클래스를 예측하는 것이기 때문에 이 부분을 수정합니다.
import os
import shutil

def filter_and_convert_labels_to_zero(label_dir, image_dir, output_label_dir, output_image_dir):
    """
    클래스 번호가 0 또는 1인 라벨만 필터링하고, 해당 라벨을 0으로 변환하며, 대응하는 이미지를 새로운 디렉토리에 복사.
    Args:
        label_dir (str): 원본 라벨 파일들이 위치한 디렉토리 경로
        image_dir (str): 원본 이미지 파일들이 위치한 디렉토리 경로
        output_label_dir (str): 필터링된 라벨 파일들을 저장할 디렉토리 경로
        output_image_dir (str): 필터링된 라벨에 해당하는 이미지를 저장할 디렉토리 경로
    """
    # 출력 디렉토리가 없으면 생성
    os.makedirs(output_label_dir, exist_ok=True)
    os.makedirs(output_image_dir, exist_ok=True)

    for label_file in os.listdir(label_dir):
        if label_file.endswith(".txt"):
            label_path = os.path.join(label_dir, label_file)

            # 파일 읽기
            with open(label_path, "r") as file:
                lines = file.readlines()

            # 클래스 번호가 0 또는 1인 데이터만 필터링하고 클래스 번호를 0으로 변환
            filtered_lines = [
                " ".join(["0"] + line.split()[1:]) + "\n"  # 클래스 번호를 0으로 변환
                for line in lines if line.split()[0] in ["0", "1"]
            ]

            # 필터링된 내용이 있을 경우 처리
            if filtered_lines:
                # 변환된 라벨 저장
                output_label_path = os.path.join(output_label_dir, label_file)
                with open(output_label_path, "w") as file:
                    file.writelines(filtered_lines)

                # 해당 이미지 파일 복사
                image_name = os.path.splitext(label_file)[0] + ".png"  # 라벨 파일 이름에서 이미지 파일 이름 생성
                image_path = os.path.join(image_dir, image_name)
                if os.path.exists(image_path):
                    shutil.copy(image_path, os.path.join(output_image_dir, image_name))

    print(f"클래스 번호가 0 또는 1인 데이터를 필터링하고, 라벨을 0으로 변환한 후 이미지를 복사했습니다.")
    print(f"라벨 디렉토리: {output_label_dir}")
    print(f"이미지 디렉토리: {output_image_dir}")

# 원본 디렉토리 설정
train_labels_dir = "/content/result/data/train/labels"
val_labels_dir = "/content/result/data/val/labels"
train_images_dir = "/content/result/data/train/images"
val_images_dir = "/content/result/data/val/images"

# 출력 디렉토리 설정
filtered_train_labels_dir = "/content/result/filtered/train/labels"
filtered_val_labels_dir = "/content/result/filtered/val/labels"
filtered_train_images_dir = "/content/result/filtered/train/images"
filtered_val_images_dir = "/content/result/filtered/val/images"

# 함수 호출
filter_and_convert_labels_to_zero(
    train_labels_dir, train_images_dir, filtered_train_labels_dir, filtered_train_images_dir
)
filter_and_convert_labels_to_zero(
    val_labels_dir, val_images_dir, filtered_val_labels_dir, filtered_val_images_dir
)


yaml_text = """train: /content/result/filtered/train/images/
val: /content/result/filtered/val/images/

nc: 1
names: ["mask"]
"""

with open("result/data/data.yaml", 'w') as file:
    file.write(yaml_text)
YOLO 학습 코드
!pip install ultralytics
울트라틱스사의 YOLO 모델을 불러와 파인튜닝을 할것이기 때문에 반드시 설치해야하는 라이브러리입니다.
# 본 프로젝트에서는 YOLO 모델의 안정성을 위해 yolov10x 를 재학습 하여 사용하였습니다.
# 에포크 100으로 진행, 배치사이즈는 기본 값
from ultralytics import YOLO

model = YOLO('yolov10x.pt')

results = model.train(data="result/data/data.yaml", epochs=100, imgsz=640, save = True)
640 사이즈의 이미지를 100에포크로 학습한다는 의미입니다.

YOLO 학습 결과
학습 결과는 다음과 같습니다.
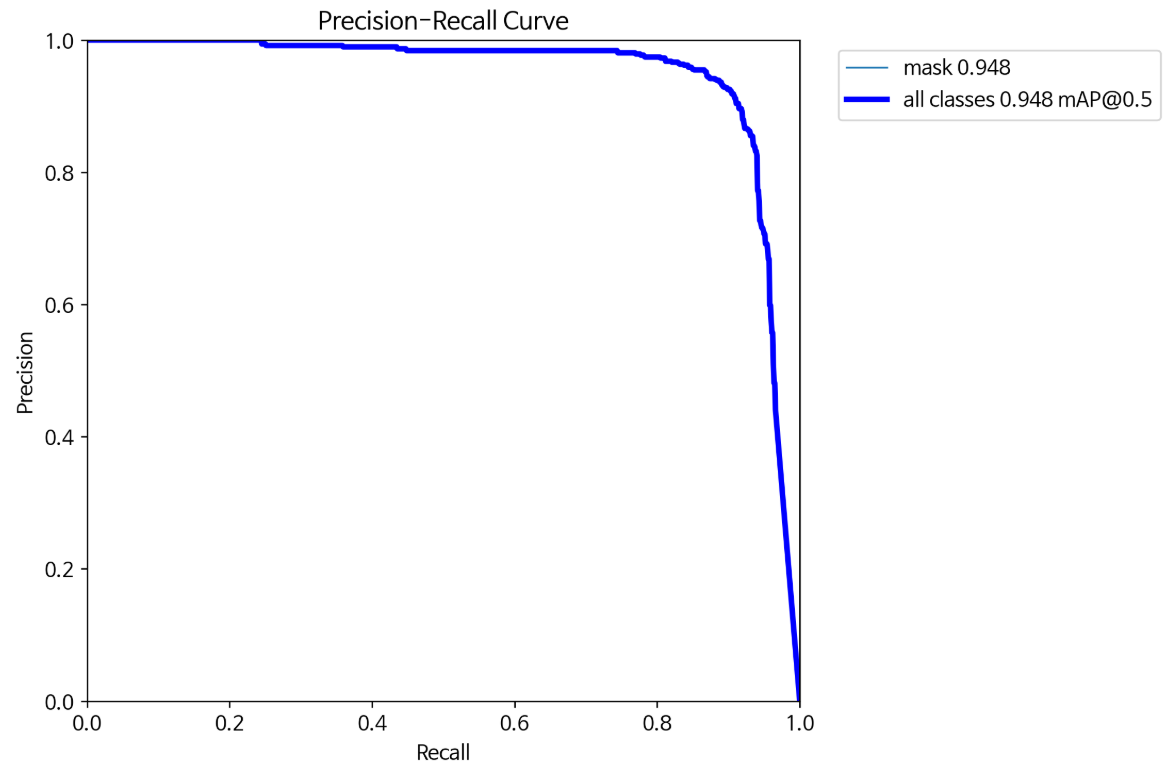
읽는 방법은 아래 사이트에서 확인해 주세요.
객체 탐지(Object Detection) 성능지표 - mAP
YOLO, Faster R-CNN 같은 객체 탐지 모델의 성능을 비교할 때 가장 많이 쓰는 지표가 바로 mAP(Mean Average Precision) 입니다.이 글에서는 mAP이 무엇이고, 왜 중요한지, 그리고 어떻게 계산되는지 아주 쉽게
whitecode2718.tistory.com

오버피팅이 일어난 것 같진 않아서 아마 에포크를 추가로 늘리면 학습 결과가 더욱 좋아질것으로 예상됩니다.
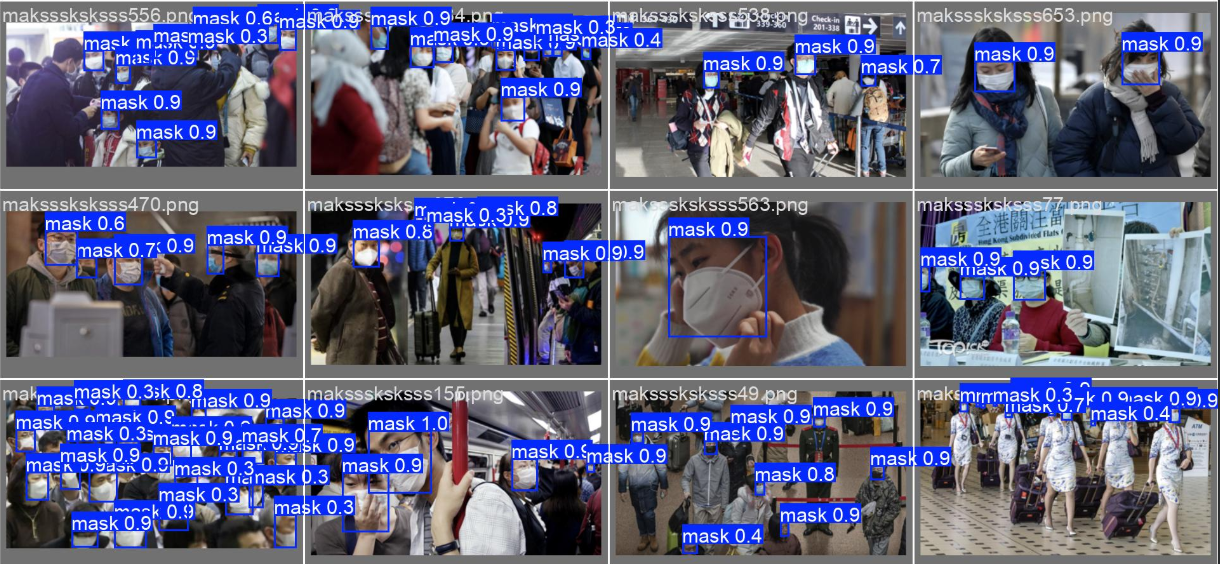
테스트셋으로 확인해보니 확실히 잘 검출한것으로 보입니다.
3. 마무리
여기까지 YOLO 모델을 어떻게 학습시켰는지 코드로 살펴보았습니다. 다음 포스팅에서는 2Step으로 딥러닝 분류모델을 어떻게 적용하고 평가했는지 다루겠습니다.
'프로젝트' 카테고리의 다른 글
| [인공지능 프로젝트] 마스크 착용 여부 탐지 프로젝트 - 3편 (0) | 2026.02.24 |
|---|---|
| [인공지능 프로젝트] 마스크 착용 여부 탐지 프로젝트 - 1편 (0) | 2026.01.22 |
| [인공지능 프로젝트] 저시력자를 위한 실내 근거리 물체 탐지 및 알림 시스템 - 7편 (GUI 및 메인 프로그램) (0) | 2026.01.09 |
| [인공지능 프로젝트] 저시력자를 위한 실내 근거리 물체 탐지 및 알림 시스템 - 6편 (통합 시스템 구축) (1) | 2026.01.02 |
| [인공지능 프로젝트] 저시력자를 위한 실내 근거리 물체 탐지 및 알림 시스템 - 5편 (깊이 추정 모델의 학습 결과) (0) | 2025.12.26 |
